Yeah, I haven't updated in a while. I've been kinda busy, off living a life and dealing with drama and blah blah blah. what's important is that I have a PRODUCT REVIEW.
Jerome Russell B-Wild temporary spray in colors
I bought one of every bright color they had at my local Walgreene's, The purple, the blue, and the green. I'll review them in order that I sprayed them into my hair.
Purple:
The purple wasn't NEARLY as vibrant as I thought it would be, given the color it showed on the bottle. It was fairly light with slight pink tones on my blond bangs and my natural hair color on the sides, but it was much darker over the the black in my mohawk. It also probably left the least amount of "dust" floating around in the air after use. Washed right out with one shampoo
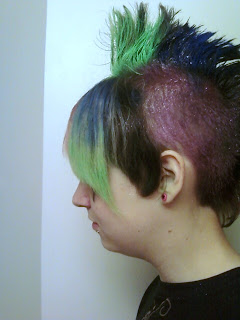
Green:
The green was shown as much darker on the bottle than what it showed up. The color I got was a bright day-glow neon green. I loved it. It showed up about the same color on both the black and blond sections of my hair, which is good. This color seemed to get EVERYWHERE though. It wasn't much of a problem, it came right off if you wiped it with a wet towel regardless of if it were on your skin or all over the bathroom sink. Washed right out of my hair with one shampoo.
Blue:
The blue color was really dark compared to the color shown on the bottle (which is odd, because the rest of the colors seemed consistently lighter) and in certain lighting it looked like it was more of a blue tint over black hair, but it showed up like that over the blond as well, so the consistency was at least good. This one probably produced the most "dust" of all of them. Either be in a well ventilated room when doing this or prepare to have blue show up when you blow your nose (yes, I'm seriously.) It didn't really do any damage to my breathing or anything, it was just there. I actually have pretty sensitive nose/breathing and it didn't do me any harm. This also washed right out with one little shampoo.
The red color I used in the very bottom of the mohawk, and on the small chunk of hair to the left was left over from Halloween a few years back. I'm not even sure what brand it is. It really was more of an auburn than a bright red. When I figure out what brand it is, I'll post a review.
Happy Dying :)
S
Sunday, July 4, 2010
Saturday, May 1, 2010
Two must have hair products.
I'm starting to wish I didn't work at a fast food restaurant just so that I didn't HAVE to shampoo my hair every day (among other reasons...)
I'll post pictures of my new hair when I get some good ones, but It's very painful for me to have only had my hair colored a certain way for a WEEK and already need to touch it up. I got some custom mixed color in it though, so I'm dying to share it. I just need GOOD pictures.
On a bright note, I've got some product to recommend.
Hair looking dull? Dry? limp? Don't want to spend all your money on products that promise to heal your dry and heat damaged hair just for it to have no more effect that conditioner?
I got two products for this.
1. Garnier Fructis Triple Nutrient Spray:
I use this obsessively. Literally, I've been using it for a month and I've gone through almost a whole bottle. But it's only about $5, so it's alright. If you're hair is looking a little dull or limp (or, if you have really short hair and it set funny while you were sleeping) you just spray it down with this and you have an instant healthy natural looking shine. I'm not sure about it's actual "hair healing' qualities, but your hair instantly be given more life. I probably use it 2 or three times a day (when I wake up, after work, sometimes after my shower.) As far as I'm aware, this also does no damage to unnatural hair colors.
2. Frizz-Ease Thermal Protection
I've only been using this for about a week or so. I'm already in love with it. Two drops after my shower on damp hair, and even when I blow dry AND straighten my hair it still keeps a lot of its softness. Remember how I was saying my stylist's razor was a bit dull and it left the ends of my hair feeling rough? When I have this you can't even tell. It's like having silk for hair. Yes, I still use my normal thermal protection, but I tend to find that it's a little lacking when I need to blowdry my hair. THIS makes up for it. I'm not sure about any effects it may have on unnatural colored hair dyes (due to pretty much baking it into your hair) but if I notice anything I'll be sure to update.
I'm still looking for the PERFECT non-dye removing shampoo.
That is all for now. I'll get back to you all with my beautiful new hair creation soon.
Happy Dyings XoXo,
S
Wednesday, April 14, 2010
Go Bold
Something that is very important for any hair experimenter is a hair stylist that gets you. I don't usually have "people." I rarely go to the same place for the same thing, or even buy the same product twice. But right now, I think I've found a stylist.
I sat myself down in the chair. I told her "do anything you. I want something different. Do whatever you feel will look good." and instead of giving me a normal cut, I got something fun, asymmetrical, and easy as hell to take care of. The back is a little poofy in the pictures, because I didn't style it myself (she blew it dry before I left, and it floofed) but wow, I never in my life thought I'd do something so short. I never felt like I'd pull off such a short look.
4 years ago, I wouldn't' have even been daring enough to to show so much of my face shape. I love it. I feel renewed. I feel bolder.
I think I've found myself a stylist :)
Happy Dyings :)
S
(I may be adding some purple to this when I touch it up)
Saturday, April 3, 2010
Raw Hair Dyes: Review
I hate making such a harsh decision based on my personal experience with Raw brand Hairdyes... but This is twice now.
The swatches LIE. I used Raw Neon Orange, because it told me my hair would turn out similar to the color of Leeloo's from the 5th Element.
THIS is what I got. This picture doesn't even BEGIN to show the toxic looking yellow tone of my hair. Like someone drank toxic waste and pissed all over my head. I left it in my hair for 60 minutes, as I always do. Took care of it the way I ALWAYS take care of my hair when I'm trying to achieve bright unnatural colors. And it came out like THAT RIGHT THERE. Nasty. I had to dye over it with Manic Panic Flaming (a red dye) to get it to the orange color I'd wanted.
Today, I dyed a girls hair using some purple color by Raw today. It came out a faded nasty blue. I told them to get it at Nirvana or Spencer's, but I can understand how the swatches at Hot Topic can be tempting. I've bought dye there more than once. I was rarely pleased though.
So, in short. Unless your into experimenting, mixing, and maybe getting lighter than expected colors, don't buy RAW. It's a big no-no.
Having hair not turn out well for me is upsetting enough. I hate myself when I do someone else's hair and it doesn't come out as vibrant as they were hoping. I hate crushing people's hope :( I may post of pic of how her hair came out if she posts one and lets me.
Happy Dying.
XoXo
S
Sunday, March 28, 2010
Improvision; The Joys of
I lack a few pictures of this dye process, sadly, as I was on an artistic high halfway through it. But I will show you some of the joys of improving when you dye your hair. Whenever I do mine, I usually have no clue what I'm actually doing. I'm a work-as-you-go kind of girl. Sometimes it doesn't end very well, but other times I end up with something so beautiful. Friday night was one of those times.
I divided up my hair, planning on simply doing a little pink in the back, and then doing the rest in green. Sexy, I know. I need to go out an buy plastic clips so I can kick my little rubber band habit. I use the back of my tinting brush to divide.
Yep, the station I has set up in the last entry. And the completion of applying the pink dye to the back section of hair. I put it in a little rubber hair band (hahaha) to keep it out of the way while I did the rest. You can see that I didn't get it fully to the roots. When doing a full head of hair in multiple colors, you only need to touch the roots where they'll be showing. If your steadier with a tint brush than I am you can attempt it, but I prefer to stay away from that as usually end up getting the other section colored as well. Bad at-home dyer, bad.
As I continued, I washed off my gloves with shampoo (to not spread the color by accident. You can also just change gloves if you have multiple pairs) I took down one side of my hair, and removed any pins that were holding it in place. I divided it in half and began to dye the frontal area/fringe green while holding the back up in a rubber hair band. When I was finished with the front from tips to roots I tied it up with a rubber hair band and let down the middle section. Since this section is thicker than the front, you'll divide it in halve horizontally and pin up the top half. to keep it out of the way.
This is where my artistic high started. I notice at this point that my hair looked REALLY nice with the chunk of blond hair in the middle, and decided to divide the other side of my head with the same method, leaving the blond as is. At the time I had wished I hadn't dyed the lower middle section yet, but it turned out to give it a nice layered effect later on.
Rinse and wash separately as needed to prevent color blending.
Happy Dying
XoXo,
S
I divided up my hair, planning on simply doing a little pink in the back, and then doing the rest in green. Sexy, I know. I need to go out an buy plastic clips so I can kick my little rubber band habit. I use the back of my tinting brush to divide.
Yep, the station I has set up in the last entry. And the completion of applying the pink dye to the back section of hair. I put it in a little rubber hair band (hahaha) to keep it out of the way while I did the rest. You can see that I didn't get it fully to the roots. When doing a full head of hair in multiple colors, you only need to touch the roots where they'll be showing. If your steadier with a tint brush than I am you can attempt it, but I prefer to stay away from that as usually end up getting the other section colored as well. Bad at-home dyer, bad.
As I continued, I washed off my gloves with shampoo (to not spread the color by accident. You can also just change gloves if you have multiple pairs) I took down one side of my hair, and removed any pins that were holding it in place. I divided it in half and began to dye the frontal area/fringe green while holding the back up in a rubber hair band. When I was finished with the front from tips to roots I tied it up with a rubber hair band and let down the middle section. Since this section is thicker than the front, you'll divide it in halve horizontally and pin up the top half. to keep it out of the way.
This is where my artistic high started. I notice at this point that my hair looked REALLY nice with the chunk of blond hair in the middle, and decided to divide the other side of my head with the same method, leaving the blond as is. At the time I had wished I hadn't dyed the lower middle section yet, but it turned out to give it a nice layered effect later on.
Manic Panic Green Envy and Manic Panic New Rose
Tada. Rinse and wash separately as needed to prevent color blending.
Happy Dying
XoXo,
S
Recycling
The Phunk-N-Ink convention is going on this weekend. I went yesterday and it was fabulous. My hair was faded and I probably had an inch of new growth, so I was planning all week to dye my hair green for the convention. I'm a procrastinator, so I didn't end up getting around to til fairly late on Friday. Luckily, I seem to work well under stress and got
Manic Panic Green Envy; Manic Panic New Rose
This entry is a guide to NOT turning your bathroom the same color as your hair while RECYCLING, and well as the pros and cons of improvising.
As an at-home hair dyer I know what it's like to accidentally turn your bathroom sink blue, and even though there are ways to get it out (mostly over a long period of time) it's best if you just avoid a situation like that all together, right? I'm renting my apartment right now, so a big green splatter on the wall is something to cause a panic seeing how I can't just paint over it.
All you need is:
-Plastic shopping bags
-scissors
-tape
-your trusty hair dying towel (don't have one, get one. Use it and only it when you dye or bleach your hair so you avoid any mishaps with nicer or more expensive towels.)
It's really simple to start. I cut up 3 wal-mart bags (split the handles and cut until I reached the seam at the bottom, and did the same to the other side) and draped them over my work area. My bathroom mirror is flat, and I prefer working with the three way, so I chose to only use the front area of the sink and use the mirror to hold the bags in place. If you intend to use the whole sink, make sure to cover it and tape everything in place. It IS important to cover the frontal area as well, just in case you drip some dye.
I prefer to keep my hair dying towel on the floor until I'm rinsing, especially because I don't want to accidentally bleach the carpet. If your whole bathroom floor is tile or linoleum you COULD just tape down more bags. I think the towel is also easier to walk and move around on, but it's personal preference.
Since I'm not using the full sink, I keep my supplies on the toilet cover. Since you'll be working with dye stained gloves, it's important to put the bag over this as well. I also have anything I'll need laying out, such as little rubber bands and bobby pins. I also put a cut up bag between the toilet and the towel in case of any drops or drips while moving between there and my work area.
Half of a bag over the door knob. Silly? NOT AT ALL. This is VERY IMPORTANT. While you dye your hair, if you drip on your skin it's important to get it off asap (especially if your using black dye; that shit stains nearly on contact) and this bag allows you something in easy reach that you can use to turn the knobs on the bathtub or sink without getting dye all over them. It's and area that sucks to clean, so it's much easier to not get any dye on them to begin with. It's also useful if you need to leave the bathroom (say, someone has to pee) and you don't want to take your gloves off and try to put them back on. Just do it. You'll find a use.
Want to let your unnatural dyes sit for longer periods of time without getting everywhere or drying (which will essentially make leaving it in your hair pointless) the pin it down with some bobby pins so that it will stay in it's respected places, pull a bag over your hair and take a little rubber hairband over the back to hold it tight. (Note: if you're using a normal hair dye, bought in a box straight off the shelf, do NOT under any circumstances use metal clips or pins while using the dye. It will cause a chemical reaction and will damage your hair. In general, I don't recommend the bag-over-the-head method with any store bought dying kits, as I'm not familiar with them or how they'll react to a lack of air.)
Yes, I know I must have a shit-load of plastic bags floating around my apartment, I really do. My brother and I never throw them out, so we shove them all in our cabinet to use in our small trashcans. We buy a lot, so we have a lot. If your living with your parents just ask them if you can keep their bags every time they go shopping. They don't take up much space.
Keep dying
XoXo,
S
(This whole entry looks like an ad to Wal-Mart)
Monday, March 8, 2010
Green Envy
I think it's been a long enough time of experiencing my Manic Panic dye that I can give you a product review. :) My first one for this blog.
Manic Panic Green Envy:
Just like any other fun dye, I applied it on blond (pre-bleached) hair and let it sit for about an hour, applied a little heat, and rinsed out. The bleach job was a little old, but it didn't harm my dye job as badly as I thought it would. This pleases me.
After my first shampoo, even though it ran a little it stayed pretty bright. almost 2 weeks later and it doesn't even run very much anymore when it's being washed. It's faded slightly, but mostly just it's depth. I do swear there's a hint of a blue sometimes in bad florescent lighting (as if the color is a little teal.)
Overall, a dye job that's lasted a full 3 weeks and regular shampooing with such minimal fading gets my stamp of approval.
I'll be dying my whole head this color after the 23rd (so it'll be nice and fresh for Phunk N' Ink) and since I'll be putting it over a full head of RECENTLY bleached hair, the longevity may be a bit better. If it can keep that deep shine the fresh unnatural colors have then I'll be one happy ass camper.
(My current state. The amount of new growth you can see just hints at how long it's been since my last root touch up. This was just taken a few seconds ago.)
I suppose if anything severe happens to the color I'll keep you updated. I'm using my oil treatments again, which may effect the colors. I'll let ya know.
Happy Dyings
XOXO
S
Labels:
green envy,
green hair,
hair,
manic panic,
phunk n' ink,
tattoo convention,
unnatural dye
Saturday, February 27, 2010
Fading
Oh blog, I've ignored you because I haven't known what to say.
Last night I shampooed the green in my hair for the first time. It faded badly, and bled to the blond because I didn't wash it all separately.
Always wash your hair separately if you don't want the color to bleed. Especially if you have your hair blond+unnatural color or two unnatural colors that are far apart on the color wheel. (red and green, blue and orange, purple and yellow are all on opposite sides of the color wheel and therefor MUST be shampooed separately. Red and orange, blue and purple, green and yellow are all next to each other on the color wheel. They will still blend a little if washed together, but the color blend will look much more natural because those colors are part of one another.)
I know this. But this was a quick dye job to begin with. I just wanted a little color to brighten up my life. I even have almost a centimeter of root growth. At least, I assume it's almost a centimeter because google told me it's about 1/3 of an inch. I'm American. I don't know the fancy metric system.
Anyway. Big tip: Unnatural dyes always stick better to hair that has just been bleached and has not yet been conditioned. It's "thirstier" that way. This will, in turn, increase the longevity of your hair color. If you already bleached a week or so ago and don't want to bleach it again just for the sake of color you can use a ph balance shampoo. Putting this in your hair before coloring (as I did this week) will help. Of course, the longer it's been since the bleaching job the less effective this will be.
For me, it's been about 3 weeks, so even with the shampoo the dye is still fading fairly quickly. If this is gonna be the case, as least know what you're gettign into so you won't be disappointed with the end results.
Happy dying. XoXo,
S
(dye pictured: Manic Panic Green Envy)
Labels:
bleach,
blond,
blonde,
conditioner,
directions,
dye,
emo,
envy,
fade,
green,
green envy,
hair,
hair care,
manic panic,
panic,
scene,
shampoo,
special effects,
unnatural dye
Wednesday, February 24, 2010
A New Begining
Since my favorite topic on my personal blog happens to be hairdye, I thought I'd start a blog just for the topic to save me some blog space (since I use a lot of it.)
I've been dying my hair unnatural colors since the summer before my senior year of high school, where I went Atomic Pink by Special Effects. I've been hooked ever since.
I have to agree with whoever said "How many times can you dye your hair reds and browns before they all look the same?" I've dyed my hair virtually every boxed shade of red imaginable, blacks, blonds and even a few browns when the occasion arose, but I'm always left wanting a little more. A splash of something SPECIAL.
Along with talking about hair dyes, reviewing what I've tried, making the impossible chronological blog with every color and 'unique' hair cut I've had since high school, I'll also be explaining how I manage to dye my hair a new color every other month and bleach the hell out of it without making it fall out.
I hope this catches your interest.
xoxo
S
Subscribe to:
Posts (Atom)